
Tenderflake pie crust baking is a trusted Canadian tradition, offering a flaky, tender texture․ Learn the classic recipe and tips for perfect results every time, easily․
What is Tenderflake Pie Crust?
Tenderflake pie crust is a beloved Canadian baking tradition, renowned for its flaky, tender texture․ Made with simple ingredients like all-purpose flour, salt, and Tenderflake lard, it delivers a crust that is both delicate and flavorful․ The secret lies in the use of high-quality lard, which creates the signature flakiness․ This crust is a favorite among home bakers and professionals alike, perfect for sweet and savory pies․ Its versatility and reliability make it a cornerstone of Canadian baking, evoking memories of homemade pies and family gatherings․ Whether you’re a novice or an expert, Tenderflake pie crust is a timeless choice for achieving bakery-quality results at home․

Importance of Proper Baking Instructions
Proper baking instructions are crucial for achieving a perfectly flaky and tender Tenderflake pie crust․ Incorrect temperatures or baking times can lead to a crust that is either undercooked, overcooked, or misshapen․ Following specific guidelines ensures the crust bakes evenly, preventing shrinkage and puffing․ Blind baking, for example, requires precise steps like pricking the dough and using weights to maintain shape․ Neglecting these steps can result in a crust that loses its form or becomes too brittle․ Adhering to instructions also enhances the crust’s texture and flavor, making it a delightful base for any filling․ Whether you’re a novice or experienced baker, accurate baking procedures are essential for consistent, professional-quality results with Tenderflake pie crust․
Gathering Ingredients and Tools
Gather essential ingredients like flour, salt, Tenderflake lard, egg, vinegar, and cold water․ Tools include a pastry blender, knives, measuring cups, rolling pin, and pie dish․
Essential Ingredients for Tenderflake Pie Crust
The key ingredients for a classic Tenderflake pie crust include 5 cups of all-purpose flour, 1-2 teaspoons of salt, and 1 lb of Tenderflake lard․ Wet ingredients consist of 1 egg, 1 tablespoon of vinegar, and 7/8 cup of cold water․ The flour provides structure, while the lard ensures flakiness․ Salt enhances flavor, and the vinegar helps create a tender texture․ Cold water is crucial for maintaining dough consistency․ These ingredients combine to create a balanced, flaky crust․ Ensure all components are measured accurately and kept cold to achieve the best results․ Proper proportions are vital for the dough’s texture and baking performance․
Necessary Tools for Pie Crust Preparation
Preparing a Tenderflake pie crust requires specific tools to ensure success․ A large mixing bowl is essential for combining ingredients․ Use a pastry blender or two knives to cut the lard into the flour evenly․ Measuring cups and spoons are crucial for accurate ingredient proportions․ A rolling pin is necessary for rolling out the dough smoothly․ A lightly floured surface or parchment paper helps prevent sticking․ A pie dish is needed for shaping the crust․ Optional tools include a fork for pricking the dough and a pastry brush for egg washes․ These tools collectively simplify the process, ensuring a perfectly flaky and tender crust every time․

Preparing the Dough
Combine flour and salt, then cut in Tenderflake lard until pea-sized․ Mix egg, vinegar, and cold water, then blend into the flour mixture until dough forms․
Mixing Dry Ingredients
Begin by whisking together 5 1/2 cups of all-purpose flour and 2 teaspoons of salt in a large bowl until well combined․ This step ensures even distribution of the salt, which enhances flavor and texture․ For a sweeter crust, add 2 teaspoons of sugar or 1 teaspoon of baking powder if desired․ Sifting the flour beforehand is optional but can help aerate it, resulting in a lighter crust․ Use a clean, dry whisk or spoon to mix thoroughly, ensuring no lumps remain․ This foundational step sets the stage for a tender, flaky crust․ Keep the mixture cool to prevent the fat from softening prematurely, which is crucial for achieving the desired texture․
Cutting in Tenderflake Lard
Cutting in Tenderflake lard is a critical step for achieving a flaky crust․ Use a pastry blender or two knives to work the cold lard into the flour mixture until it resembles coarse oatmeal or pea-sized pieces․ Ensure the lard remains icy cold, as this prevents it from melting and blending too thoroughly with the flour, which can lead to a tough crust․ Gently distribute the lard throughout the flour, avoiding overworking the mixture․ This process creates the layers that give the crust its signature flakiness․ Stop once the mixture is evenly textured with visible fat pockets, as further blending will compromise the crust’s tenderness․
Combining Wet Ingredients
Combining wet ingredients is a delicate step in Tenderflake pie crust preparation․ In a 1-cup measure, whisk together 1 slightly stirred egg and 1 tablespoon of vinegar․ Add ice-cold water to make 1 cup․ This mixture enhances moisture and tenderness without making the dough too sticky․ Gently pour the wet ingredients into the flour-lard mixture, stirring with a fork until the dough just comes together; Overmixing can lead to a tough crust, so stop as soon as the ingredients are combined․ The dough should be shaggy but hold together when pressed․ This step ensures the crust remains flaky and tender, with the egg adding richness and the vinegar preventing excessive gluten formation․
Forming the Dough
Once the wet and dry ingredients are combined, turn the dough onto a lightly floured surface․ Gently knead it 2-3 times until it forms a cohesive mass, being careful not to overwork․ Divide the dough into portions for single or double crusts, depending on your recipe․ Shape each portion into a flat disc, ensuring even thickness․ Wrap each disc tightly in plastic wrap and chill in the refrigerator for at least 30 minutes․ This step allows the gluten to relax and the fat to firm, making the dough easier to roll out later․ Properly formed dough ensures a smooth, even texture and a flaky crust when baked․

Rolling Out the Dough
Rolling out Tenderflake dough requires a lightly floured surface and gentle pressure to maintain even thickness․ Chill the dough first to relax gluten, ensuring a smooth roll-out․ Aim for a uniform circle for consistent baking․
Tips for Rolling Out Pie Dough
Rolling out Tenderflake pie dough requires precision to achieve a flaky, even crust․ Ensure the dough is well-chilled to relax gluten, making it easier to handle․ Lightly flour your work surface and rolling pin to prevent sticking․ Roll from the center outward, applying gentle, consistent pressure to maintain uniform thickness․ Rotate the dough 90 degrees every few rolls to ensure even distribution․ Avoid overworking, as this can lead to a tough crust․ Use a ruler or measuring tape to check thickness, aiming for about 1/8 inch․ If the dough begins to soften, refrigerate it for 10 minutes before continuing․ Roll outward without stretching, as stretching can cause shrinkage during baking․ Use a pastry cloth or lightly floured surface to prevent sticking and ensure smooth rolling․ By following these tips, you’ll achieve a perfectly rolled-out crust ready for baking․
Common Mistakes to Avoid
When working with Tenderflake pie crust, avoid overworking the dough, as it can lead to a tough, dense crust․ Ensure the dough is well-chilled to prevent softening and tearing․ Over-rolling the dough can cause it to lose its flaky texture․ Avoid stretching the dough into the pie dish, as this can lead to shrinkage during baking․ Not pricking the bottom of the crust before blind baking can result in puffing․ Using the wrong type of fat or incorrect measurements can affect the crust’s flakiness․ Lastly, not following the package instructions for oven temperature and baking times can lead to an undercooked or burnt crust․ Attention to these details ensures a perfect bake․
Chilling the Dough
Chilling the dough is essential for relaxation, preventing shrinkage, and ensuring flakiness․ Always refrigerate before rolling for best results․
Why Chilling is Crucial
Chilling the dough is essential for achieving a flaky and tender crust․ It allows the gluten to relax, preventing shrinkage during baking․ The fat (lard or butter) solidifies, creating layers that expand when baked, ensuring a light texture․ Without chilling, the dough may stretch unevenly, leading to a tough crust․ Additionally, chilling prevents the butter from melting prematurely, which can cause the crust to become greasy․ Proper chilling also makes the dough easier to roll out and handle, ensuring a smooth, even texture․ This step is vital for maintaining the integrity of the dough and achieving the desired flaky, melt-in-your-mouth result․
Best Practices for Chilling
To ensure optimal results, chill the dough for at least 30 minutes․ Wrap it tightly in plastic wrap to prevent drying․ For extended storage, refrigerate for up to 2 days or freeze for 3 months․ Thaw frozen dough overnight in the fridge before use․ If dough becomes too firm, let it sit at room temperature for 10 minutes․ Chilling helps relax gluten, making the dough easier to roll out․ Always chill rolled-out dough on a baking sheet before baking․ This prevents shrinkage and ensures a flaky texture․ Proper chilling is key to a professional-quality crust, so never skip this step in your pie-making process․
Assembling the Pie
Assembling the pie involves carefully placing the chilled dough into the pie dish, ensuring it fits snugly, and preparing it for baking with your chosen filling․
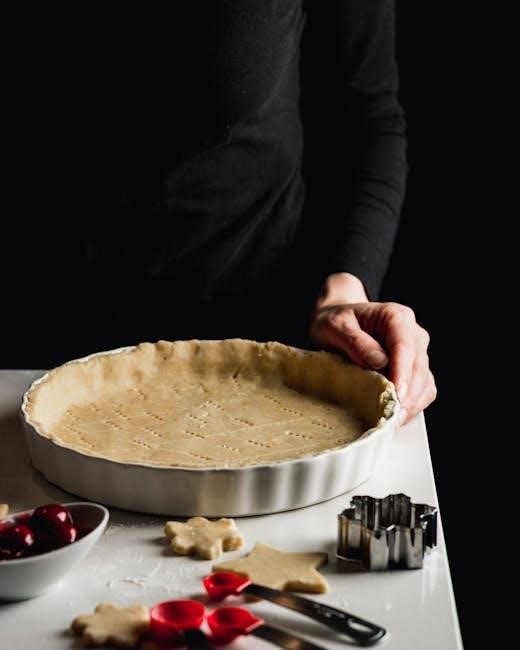
Placing the Dough in the Pie Dish
Once the dough is rolled out, carefully transfer it to a lightly floured pie dish․ Gently press the dough into the bottom and sides, ensuring it fits snugly without stretching․ Trim any excess dough from the edges, leaving about 1/2 inch overhang for crimping․ Use a fork or your fingers to crimp the edges, creating a decorative border that prevents the crust from shrinking during baking․ For a double-crust pie, place the rolled-out top crust over the filling, trim excess, and crimp the edges to seal․ Prick the bottom crust with a fork to prevent air bubbles․ If blind baking, line with parchment paper and add pie weights to maintain shape during baking․ Always chill the dough in the pie dish for at least 15 minutes before baking to ensure a flaky and tender crust․ This step is crucial for achieving the perfect texture and preventing shrinkage․ Proper placement and preparation of the dough ensure a professional finish and delicious results every time․
Crimping the Edges
Crimping the edges of a Tenderflake pie crust is a crucial step for both functionality and aesthetics․ Once the dough is placed in the pie dish, use your fingers or a fork to create a decorative border․ For a classic crimp, press the dough between your thumb and index finger, forming a fluted edge․ Alternatively, use the tines of a fork to press a pattern into the dough․ This step not only adds visual appeal but also prevents the crust from shrinking during baking․ Ensure the edges are evenly crimped and not too thick, as this can lead to a dense texture․ Proper crimping helps seal the pie and creates a beautiful, professional finish․ Consistency is key for a polished look․
Blind Baking the Crust
Preventing Shrinkage and Puffing
To prevent crust shrinkage and puffing during blind baking, dock the dough with a fork and line with parchment paper weighted with pie weights․ Ensure even chilling․
What is Blind Baking?
Blind baking is the process of pre-baking a pie crust without a filling․ This method is essential for pies with liquid fillings, like custards or creams, to prevent sogginess․ To blind bake, dock the crust with a fork, line it with parchment paper, and add pie weights or beans․ Bake at 375°F for 20-30 minutes, or until golden․ This ensures the crust holds its shape and stays flaky․ It’s a crucial step for achieving a perfectly cooked crust before adding your favorite filling․ Blind baking guarantees a crispy, golden base for any pie recipe․ Follow these steps for a professional finish every time․ Perfect for both sweet and savory creations․
How to Blind Bake
To blind bake a Tenderflake pie crust, preheat your oven to 400°F (200°C)․ Prick the bottom and sides of the crust with a fork to prevent puffing․ Line the crust with parchment paper and fill with pie weights or dried beans․ Bake for 8-10 minutes, then remove the parchment and weights․ If the crust puffs, gently prick it again with a fork․ Continue baking for an additional 5-7 minutes, or until the crust is lightly golden․ Allow the crust to cool completely before filling․ This method ensures a perfectly baked base for your pie, preventing sogginess and ensuring a flaky texture․ Follow these steps for a professional finish every time․ Blind baking is essential for pies with liquid or custard fillings․ Always prick the crust to avoid air bubbles forming during baking․ Use pie weights or beans to keep the crust flat and evenly baked․ After removing the weights, let the crust cool slightly before adding your favorite filling․ This step is crucial for achieving a crisp, golden crust that holds its shape beautifully․ Perfect for both sweet and savory pies, blind baking is a must-know technique for any baker․ By following these simple steps, you’ll ensure your pie crust is perfectly prepared for any filling․ Always remember to dock the crust thoroughly to prevent puffing, ensuring a smooth, even surface for your filling․ Blind baking is a straightforward process that ensures your pie crust is ready for any recipe․ With these easy steps, you’ll achieve a professional-quality crust every time․ Blind baking is an essential step for any pie that doesn’t require baking the filling, such as cream pies or chess pies․ It ensures the crust is fully cooked and ready to hold your delicious filling․ Always use pie weights or beans to keep the crust flat during baking․ After blind baking, allow the crust to cool completely before filling and serving․ This ensures the crust remains crispy and doesn’t become soggy․ Blind baking is a simple yet crucial step in creating the perfect pie․ Follow these steps for a flaky, golden crust that complements any filling․ Blind baking is a must for any baker looking to create professional-quality pies at home․ With these easy steps, you’ll achieve a perfectly baked crust every time․ Always remember to dock the crust and use pie weights or beans for the best results․ Blind baking ensures your pie crust is crispy, golden, and ready for your favorite filling․ Follow these steps for a delicious, professional-quality pie crust․ Blind baking is a simple process that ensures your pie crust is perfectly cooked and ready to hold any filling․ Always dock the crust and use pie weights or beans to keep it flat during baking․ After blind baking, allow the crust to cool completely before adding your filling․ This ensures the crust remains crispy and doesn’t become soggy․ Blind baking is an essential step for any pie that doesn’t require baking the filling, such as cream pies or chess pies․ It ensures the crust is fully cooked and ready to hold your delicious filling․ Always use pie weights or beans to keep the crust flat during baking․ After blind baking, allow the crust to cool completely before filling and serving․ This ensures the crust remains crispy and doesn’t become soggy․ Blind baking is a simple yet crucial step in creating the perfect pie․ Follow these steps for a flaky, golden crust that complements any filling․ Blind baking is a must for any baker looking to create professional-quality pies at home․ With these easy steps, you’ll achieve a perfectly baked crust every time․ Always remember to dock the crust and use pie weights or beans for the best results․ Blind baking ensures your pie crust is crispy, golden, and ready for your favorite filling․ Follow these steps for a delicious, professional-quality pie crust․
To prevent shrinkage and puffing when baking a Tenderflake pie crust, ensure the dough is well-chilled before baking․ Prick the bottom and sides with a fork to allow steam to escape, preventing air bubbles from forming․ Line the crust with parchment paper and fill with pie weights or dried beans to keep it flat during blind baking․ Avoid overworking the dough, as this can lead to shrinkage․ Bake at the correct temperature, usually 400°F (200°C), and avoid opening the oven too soon․ If the crust starts to puff, gently prick it with a fork to release trapped air․ Following these steps ensures a smooth, even crust without shrinkage or puffing․ Proper chilling and docking are key to a professional finish․ Always use pie weights or beans for added stability․ Allow the crust to cool slightly before filling to maintain its structure․ These techniques ensure your pie crust remains perfectly flaky and evenly baked, avoiding common issues like shrinkage and puffing․ By following these tips, you’ll achieve a crisp, golden crust that holds its shape beautifully․ Remember, a well-prepared crust is the foundation of a perfect pie․ Always dock the crust thoroughly and use weights to prevent movement during baking․ This ensures the crust bakes evenly and doesn’t shrink or puff excessively․ Proper preparation and baking techniques are essential for achieving a professional-quality crust․ Blind baking with weights helps maintain the crust’s shape and prevents puffing․ Always allow the crust to cool before filling to ensure it stays crisp; These simple steps will help you create a flawless pie crust every time․ Preventing shrinkage and puffing requires attention to detail and proper techniques․ Chill the dough, dock the crust, and use pie weights for the best results․ Follow these steps to ensure your pie crust is perfectly baked and ready for your favorite filling․ Always remember to dock the crust thoroughly to prevent air bubbles from forming during baking․ Using pie weights or beans helps the crust hold its shape and bake evenly․ Avoid overworking the dough to prevent shrinkage, and ensure the oven is at the correct temperature․ By following these tips, you’ll achieve a smooth, even crust without puffing or shrinkage․ Proper preparation and baking techniques are essential for a professional-quality crust․ Always dock the crust and use weights for the best results․ Allow the crust to cool slightly before filling to maintain its structure․ These simple steps ensure your pie crust is perfectly baked and ready to hold your delicious filling․ Preventing shrinkage and puffing is easy with the right techniques․ Chill the dough, dock the crust, and use pie weights during blind baking․ Avoid opening the oven too soon, as this can cause the crust to sink․ By following these steps, you’ll achieve a perfectly baked crust every time․ Always remember to dock the crust thoroughly to prevent air bubbles from forming․ Using pie weights or beans helps the crust bake evenly and prevents shrinkage․ Proper chilling and baking techniques are essential for a professional finish․ Follow these tips to ensure your pie crust is crisp, golden, and perfectly shaped․ Preventing shrinkage and puffing requires careful preparation and attention to detail․ Always dock the crust, use pie weights, and bake at the correct temperature․ By following these steps, you’ll achieve a flawless pie crust that’s ready for your favorite filling․ Proper techniques ensure the crust remains smooth and even, without unsightly bubbles or shrinkage․ Always allow the crust to cool slightly before filling to maintain its structure․ With these tips, you’ll create professional-quality pies every time․ Preventing shrinkage and puffing is essential for a perfect pie crust․ Ensure the dough is well-chilled, dock the crust thoroughly, and use pie weights during blind baking․ Avoid overworking the dough and bake at the recommended temperature․ Follow these steps to achieve a smooth, even crust that holds its shape beautifully․ Always remember to dock the crust and use weights to prevent movement during baking․ Proper preparation and baking techniques ensure a crisp, golden crust without shrinkage or puffing․ Follow these tips for a professional-quality finish every time․ Preventing shrinkage and puffing is crucial for a perfect pie crust․ Chill the dough, dock the crust, and use pie weights during blind baking․ Avoid opening the oven too soon and ensure the crust is baked at the correct temperature․ By following these steps, you’ll achieve a smooth, even crust that’s ready for your favorite filling․ Always remember to dock the crust thoroughly to prevent air bubbles from forming․ Using pie weights or beans helps the crust bake evenly and prevents shrinkage․ Proper techniques ensure a professional-quality crust with a crisp, golden finish․ Follow these tips for flawless results every time․ Preventing shrinkage and puffing is easy when you follow the right steps․ Dock the crust, use pie weights, and bake at the correct temperature․ Always chill the dough before baking and avoid overworking it․ By following these tips, you’ll achieve a perfectly baked crust every time․ Proper preparation and baking techniques ensure the crust remains smooth and even, without unsightly bubbles or shrinkage․ Always allow the crust to cool slightly before filling to maintain its structure․ With these tips, you’ll create professional-quality pies every time․ Preventing shrinkage and puffing requires attention to detail and proper techniques․ Chill the dough, dock the crust, and use pie weights during blind baking․ Bake at the recommended temperature and avoid opening the oven too soon․ Follow these steps to ensure your pie crust is perfectly baked and ready for your delicious filling․ Always remember to dock the crust thoroughly to prevent air bubbles from forming․ Using pie weights or beans helps the crust hold its shape and bake evenly․ Proper preparation and baking techniques ensure a crisp, golden crust without shrinkage or puffing․ Follow these tips for a professional-quality finish every time․ Preventing shrinkage and puffing is essential for achieving a perfect pie crust․ Always dock the crust, use pie weights, and bake at the correct temperature․ Chill the dough before baking and avoid overworking it to prevent shrinkage․ By following these steps, you’ll achieve a smooth, even crust that’s ready for your favorite filling․ Proper techniques ensure the crust remains crisp and golden, without unsightly bubbles or shrinkage․ Follow these tips for flawless results every time․ Preventing shrinkage and puffing is crucial for a professional-quality pie crust․ Dock the crust thoroughly, use pie weights during blind baking, and ensure the dough is well-chilled․ Bake at the recommended temperature and avoid opening the oven too soon․ By following these steps, you’ll achieve a perfectly baked crust every time․ Proper preparation and baking techniques ensure the crust remains smooth and even, without shrinkage or puffing․ Always allow the crust to cool slightly before filling to maintain its structure․ Follow these tips for a flawless finish every time․ Preventing shrinkage and puffing is easy when you follow the right techniques․ Always dock the crust, use pie weights, and bake at the correct temperature․ Ensure the dough is well-chilled and avoid overworking it․ By following these steps, you’ll achieve a smooth, even crust that’s ready for your favorite filling․ Proper preparation and baking techniques ensure a crisp, golden crust without shrinkage or puffing․ Follow these tips for a professional-quality finish every time․ Preventing shrinkage and puffing requires careful preparation and attention to detail․ Always dock the crust, use pie weights, and bake at the recommended temperature․ Chill the dough before baking and avoid overworking it to prevent shrinkage․ By following these steps, you’ll achieve a perfectly baked crust every time․ Proper techniques ensure the crust remains smooth and even, without unsightly bubbles or shrinkage․ Always allow the crust to cool slightly before filling to maintain its structure․ With these tips, you’ll create professional-quality pies every time․ Preventing shrinkage and puffing is essential for a perfect pie crust․ Ensure the dough is well-chilled, dock the crust thoroughly, and use pie weights during blind baking․ Bake at the correct temperature and avoid opening the oven too soon․ Follow these steps to achieve a smooth, even crust that’s ready for your favorite filling․ Always remember to dock the crust thoroughly to prevent air bubbles from forming․ Using pie weights or beans helps the crust bake evenly and prevents shrinkage․ Proper techniques ensure a professional-quality crust with a crisp, golden finish․ Follow these tips for flawless results every time․ Preventing shrinkage and puffing is crucial for a professional-quality pie crust․ Dock the crust, use pie weights, and bake at the correct temperature․ Always chill the dough before baking and avoid overworking it to prevent shrinkage․ By following these steps, you’ll achieve a perfectly baked crust every time․ Proper preparation and baking techniques ensure the crust remains smooth and even, without shrinkage or puffing․ Always allow the crust to cool slightly before filling to maintain its structure․ Follow these tips for a professional-quality finish every time․ Preventing shrinkage and puffing is easy when you follow the right steps․ Dock the crust, use pie weights, and bake at the correct temperature․ Ensure the dough is well-chilled and avoid overworking it․ By following these steps, you’ll achieve a smooth, even crust that’s ready for your favorite filling․ Proper preparation and baking techniques ensure a crisp, golden crust without shrinkage or puffing․ Follow these tips for a professional-quality finish every time․ Preventing shrinkage and puffing requires attention to detail and proper techniques․ Always dock the crust, use pie weights, and bake at the recommended temperature․ Chill the dough before baking and avoid opening the oven too soon․ By following these steps, you’ll achieve a perfectly baked crust every time․ Proper techniques ensure the crust remains smooth and even, without unsightly bubbles or shrinkage․ Always allow the crust to cool slightly before filling to maintain its structure․ Follow these tips for a professional-quality finish every time․ Preventing shrinkage and puffing is essential for achieving a perfect pie crust․ Chill the dough, dock the crust thoroughly, and use pie weights during blind baking․ Avoid overworking the dough
Baking the Pie with Filling
Bake the pie at 400°F (200°C) for 40-50 minutes, covering the top when golden․ Ensure the crust is golden and filling cooked through for perfect results․
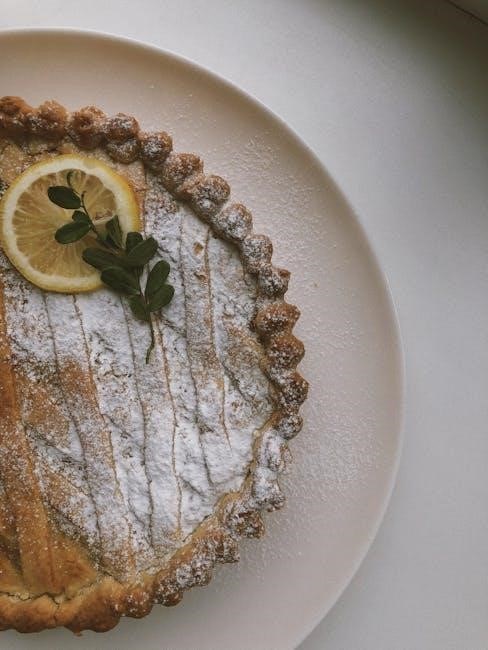
Single-Crust Pie Baking
For single-crust pies, preheat your oven to 400°F (200°C)․ Place the filled pie on a baking sheet and bake for 40-50 minutes, or until the crust is golden brown and the filling is cooked through․ Cover the top with foil if the crust browns too quickly․ Prick the bottom of the crust with a fork before baking to prevent air bubbles․ Ensure the filling is fully set and bubbling slightly around the edges․ Allow the pie to cool slightly before serving․ This method works perfectly for pies like apple, pumpkin, or cherry, ensuring a flaky crust and a perfectly cooked filling every time․ Always monitor the pie during baking to avoid over-browning․
Additional Resources
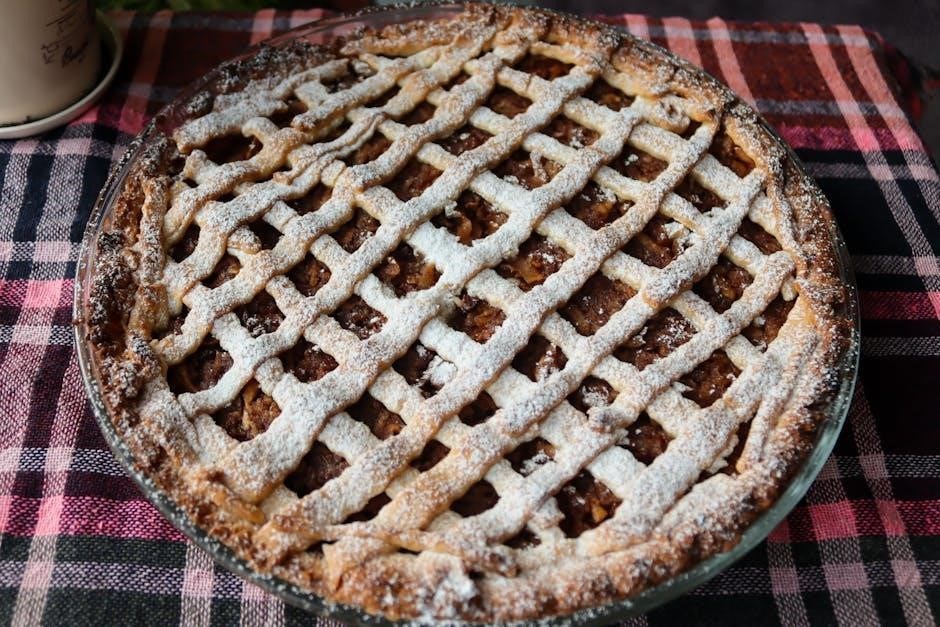
Double-Crust Pie Baking
Double-crust pies require a slightly different approach․ Preheat your oven to 400°F (200°C)․ Place the filled pie on a baking sheet and bake for 25-30 minutes, then reduce the temperature to 350°F (175°C) for an additional 25-35 minutes․ Cover the edges with foil to prevent over-browning․ Ensure the top crust is vented to allow steam to escape, preventing the filling from becoming soggy․ The crust should be golden brown and the filling bubbling evenly around the edges․ Double-crust pies are ideal for hearty fillings like blueberry or raspberry, offering a balanced texture with a tender crust․ Always monitor the pie during baking to ensure the crust cooks evenly without burning․ This method ensures a perfectly flaky and tender crust every time․